There is a quiet grief that comes when a beloved pair of wireless earbuds dies. Not the dramatic death of a cracked screen, but the slow, sad fading of battery life. First, they last three hours. Then one hour. Then, finally, a cruel twenty minutes before that familiar chime of surrender. The manufacturer wants you to believe they are disposable. The repair shop wants $80. But the truth is far more hopeful. Your earbuds are not dead. Their lithium pouch cell is simply old. And you can replace it.
This is not a guide for electrical engineers. There will be no soldering irons, no multimeters, no cursing at melted wires. Modern wireless earbuds—from AirPods to Galaxy Buds to Nothing Ear—contain a beautiful secret: a tiny, standardized JST 1.25mm battery connector. It is a plug, no different from the one on your phone charger. In fifteen minutes, with ten dollars and a plastic spudger, you can give your dead earbuds a second life. Here is exactly how.
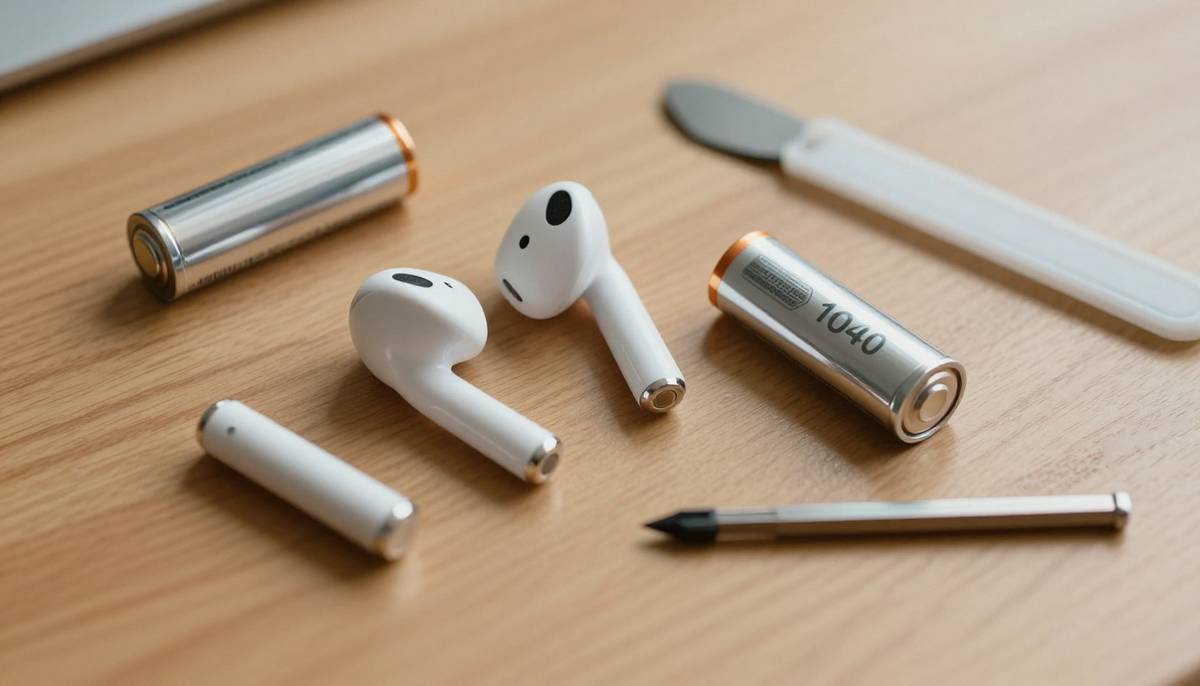
Figure 1: The anatomy of a repair — a disassembled earbud, its old lithium battery, and the only tools you need.
📖 Table of Contents
- 1. Why Your Expensive Earbuds Die After 18 Months (The Chemistry of Sadness)
- 2. Identifying Your Battery: Size Codes, Voltage, and the Magic Connector
- 3. The $10 Toolkit: What You Actually Need (And What You Don’t)
- 4. Step-by-Step Tutorial: Opening, Swapping, and Closing Without Damage
- 5. Where to Buy Genuine Batteries (Avoid Exploding Fakes)
- 6. The First Charge: Calibrating Your New Battery for Maximum Lifespan
- 7. The Satisfaction of Repair: A Middle Finger to Planned Obsolescence
1. Why Your Expensive Earbuds Die After 18 Months (The Chemistry of Sadness)
Your wireless earbuds contain a lithium-ion polymer (LiPo) pouch cell. Unlike the cylindrical batteries in phones or laptops, these are flat, soft, silver pouches—exactly like the ones in thin smartwatches or fitness trackers. They are chemically identical to larger lithium batteries but packaged differently.
Every time you fully drain your earbuds and recharge them, you complete one “charge cycle.” LiPo batteries are rated for roughly 300 to 500 full cycles before their capacity drops below 80%. If you use your earbuds for two hours daily, you will hit 300 cycles in about 15 months. That is not a defect. That is chemistry. The lithium ions literally lose their ability to move between the anode and cathode. The battery doesn’t fail. It tires.
2. Identifying Your Battery: Size Codes, Voltage, and the Magic Connector
Before you buy anything, you must identify two things: the physical size and the connector type. This is easier than it sounds.
The Size Code (Example: 1040, 1254, 1454)
LiPo pouch cells use a four-digit code: AABB where AA = width in millimeters, BB = length in millimeters. A 1040 battery is 10mm wide and 40mm long. AirPods Pro (1st gen) use a 1040. Galaxy Buds2 Pro use a 1254. The original AirPods use a tiny 1020.
The Voltage (Always 3.7V Nominal)
Almost every wireless earbud on the planet uses a 3.7V nominal (4.2V max) LiPo cell. Do not buy 3.8V or 3.85V cells. Stick to 3.7V. The difference is small but can confuse the charging circuit.
The Magic Connector: JST 1.25mm PH Series
This is where manufacturers accidentally made repair possible. Instead of soldering wires directly to the circuit board, most premium earbuds (Apple, Samsung, Sony, Nothing, Jabra) use a JST PH 1.25mm 2-pin connector. It is a tiny white plastic plug. It costs manufacturers $0.02 extra. For you, it means no soldering iron.
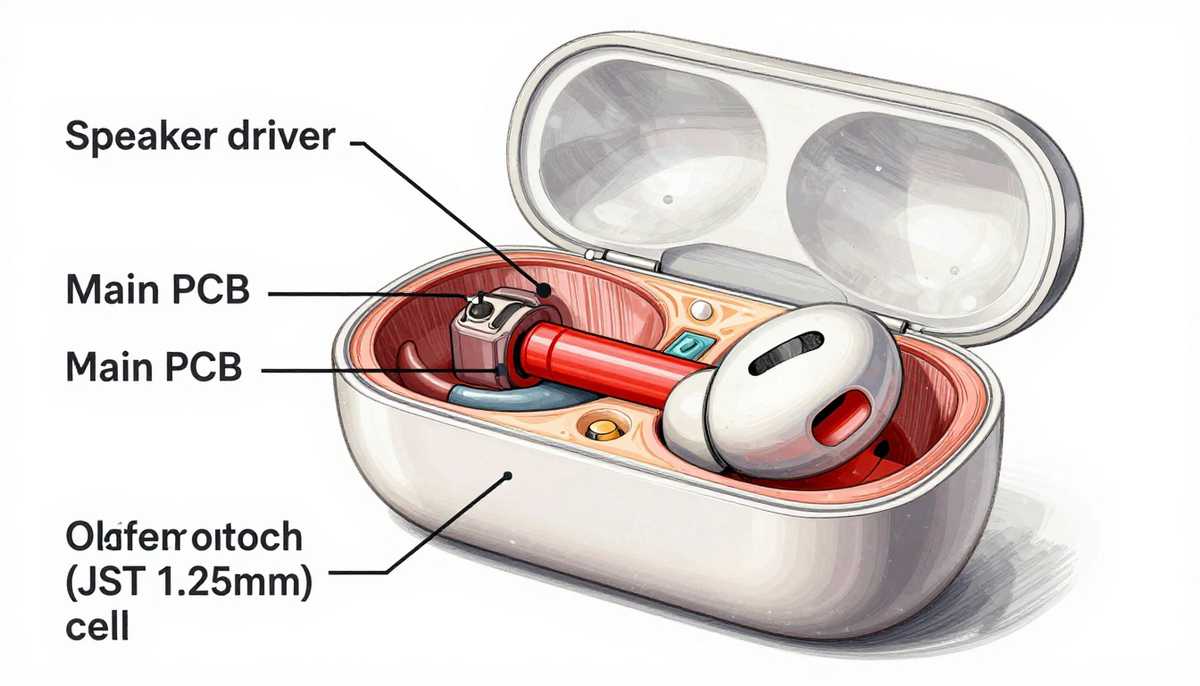
Figure 2: The internal anatomy — the JST 1.25mm connector (red highlight) is your gateway to a no-soldering repair.
3. The $10 Toolkit: What You Actually Need (And What You Don’t)
Forget heat guns and soldering stations. Here is your real shopping list:
| Tool | Purpose | Alternative |
|---|---|---|
| Plastic spudger (or guitar pick) | Opening the earbud shell without scratching | Fingernail, old credit card cut to shape |
| Pentalobe screwdriver (PL1 or PL2) | Apple earbuds only. Samsung uses Phillips #000 | Check your screw type first |
| Tweezers (ceramic or plastic tip) | Handling the tiny JST connector | Small needle-nose pliers |
| Isopropyl alcohol (90%+) | Dissolving old adhesive under the battery | Hair dryer on LOW heat (risky) |
Total cost if buying new: ~$12 on Amazon or iFixit. Total cost if you own a guitar pick and tweezers: $0.
4. Step-by-Step Tutorial: Opening, Swapping, and Closing Without Damage
This process assumes you have already confirmed your earbud uses a JST connector. Work on a clean, bright surface. A white paper towel helps you see tiny screws.
Step 1: Discharge the Earbuds Completely
Use them until they die and refuse to turn on. A fully discharged LiPo battery is safer to handle and less likely to short circuit during removal.
Step 2: Heat the Adhesive (Gentle Method)
Most earbuds are held together with soft adhesive, not clips. Use a hair dryer on LOW heat for 10-15 seconds around the seam. Do not use a heat gun. You will melt the plastic shell. Alternatively, a warm (not hot) mug placed on the earbud for 30 seconds works.
Step 3: Pry Open the Shell
Insert your plastic spudger or guitar pick into the seam where the earbud tip meets the main body. Gently twist. You will hear a soft “pop.” Work your way around the circumference slowly. Patience > force.
Step 4: Locate and Disconnect the Old Battery
Inside, you will see the main circuit board (green or black) and the silver pouch battery. Follow the two thin red and black wires from the battery. They lead to the JST 1.25mm white connector. Use your tweezers to grip the sides of the connector (not the wires) and pull straight up. It requires very little force.
Step 5: Remove the Old Battery (Adhesive Is Your Enemy)
The battery is glued down. Dribble one drop of isopropyl alcohol along the edge of the battery using a toothpick. Wait 30 seconds. The adhesive will turn into a soft gel. Slide your spudger under the battery—not into it—and gently lift. Never puncture the silver pouch. It will smoke and smell terrible (and possibly catch fire).
Step 6: Connect the New Battery
Take your new 3.7V LiPo pouch cell with the matching JST connector. Align the plug carefully—it is keyed and only fits one way. Gently press until you feel a tiny click. That is the latch engaging. Do not force it.
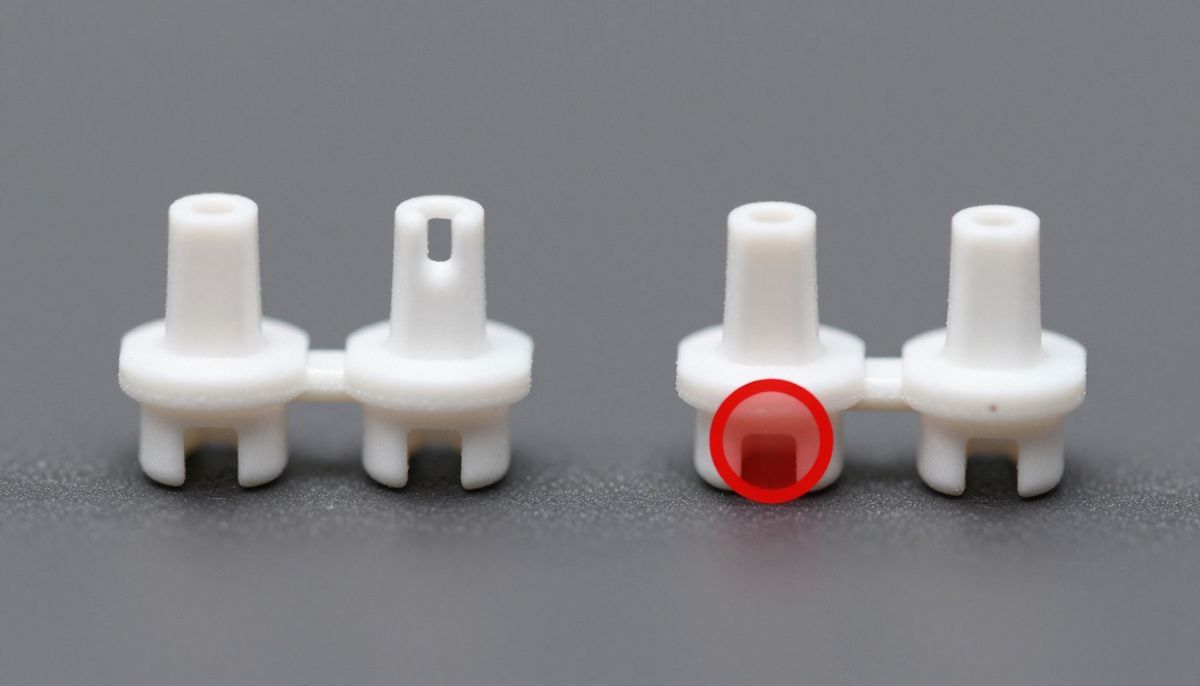
Figure 3: The critical connection — aligning and pressing the JST 1.25mm connector until it clicks.
Step 7: Secure and Close
Use a tiny piece of double-sided tape (or a dab of B-7000 glue) to hold the new battery in the same position as the old one. Press the shell closed. If it doesn’t snap shut, check for pinched wires. Clean any excess glue with a toothpick.
Step 8: The First Test
Place the earbud in its charging case. The LED should light up normally. If nothing happens, the connector is not fully seated. Reopen and check.
5. Where to Buy Genuine Batteries (Avoid Exploding Fakes)
The battery market is full of counterfeits. A fake LiPo cell may work for two weeks before swelling or catching fire. Buy only from these verified sources:
- iFixit (USA/Global): Sells pre-tested, genuine cells for AirPods, Galaxy Buds, and Sony WF series. Most expensive but safest. (~$15-20 per battery)
- Mobiledefenders (EU): Wholesale-quality replacement parts. Requires a minimum order but excellent quality.
- AliExpress (Shenzhen, China): Cheap but risky. Only buy from sellers with >98% positive feedback and at least 500 reviews. Search for “1040 LiPo JST 1.25mm 3.7V.” Expect to pay $3-6 per battery. Buy two extras.
- Local phone repair shop: Walk in and ask. Many will sell you a battery for $10 if you promise to install it yourself.
6. The First Charge: Calibrating Your New Battery for Maximum Lifespan
A new LiPo battery arrives with approximately 40-50% charge (storage voltage). It has never been fully cycled. Follow this calibration process exactly:
- First charge: Place the earbud in its case and charge it uninterrupted until the case LED turns green (or stops blinking). Do not remove it early. This can take 60-90 minutes.
- First use: Use the earbud normally until it dies completely and shuts off. This “deep discharge” is bad for daily use but good for one-time calibration.
- Second charge: Charge it fully again, uninterrupted.
- Normal use: After this cycle, use your earbuds normally. Avoid full discharges going forward. Keep them between 20% and 80% for the longest lifespan.
Your earbuds will now report accurate battery percentages. The new cell should deliver 90-100% of its original factory runtime (usually 4-6 hours depending on the model).
7. The Satisfaction of Repair: A Middle Finger to Planned Obsolescence
There is a quiet, almost rebellious joy in fixing something yourself. It is not about saving money—though saving $190 on a $200 pair of earbuds is undeniably satisfying. It is about refusing to accept that a perfectly good speaker, microphone, and Bluetooth chip should be thrown away because a $4 battery grew tired.
Your earbuds are not disposable. They are repairable. That tiny JST connector is proof that somewhere inside a design lab, an engineer made a choice to use a plug instead of solder. That choice was an invitation. Accept it. Open your earbuds. Swap the battery. And when your friends complain about their dying AirPods, you can smile and say, “I know how to fix that.”